Experiences & Add-ons
Attach add-on groups to an experience
Choose which add-on groups guests can see and select when booking a specific experience.
What add-on attachment controls
Add-on groups are created separately in Settings / Addons. The experience controls which of those active groups can appear when a guest books that specific experience.
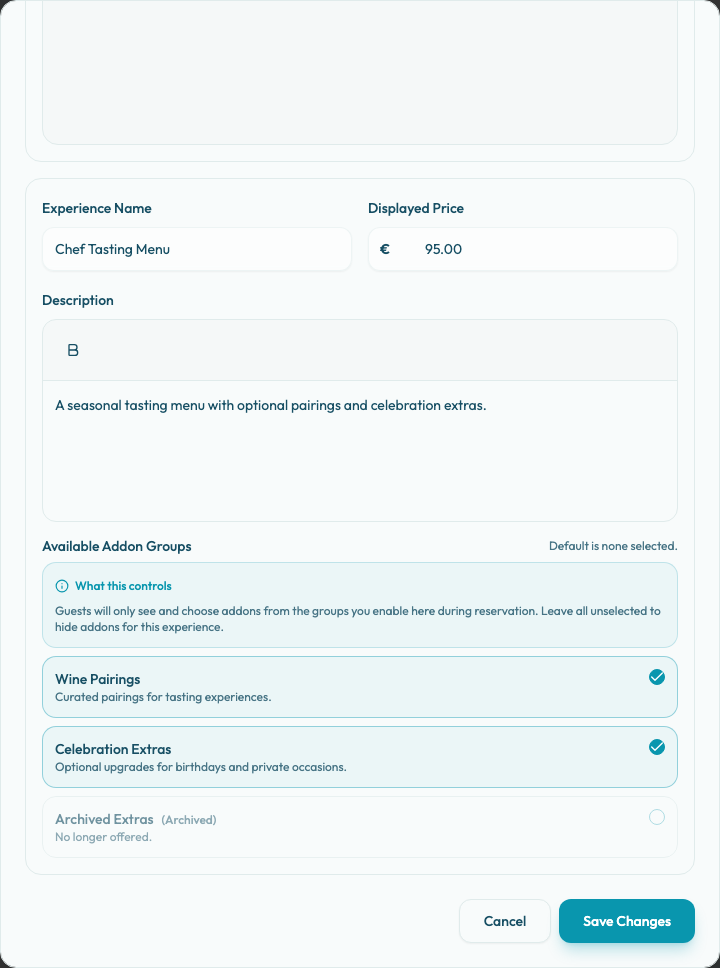
Open Settings / Experiences, edit the experience, and use the Basics tab to select groups in Available Addon Groups.
Before you attach groups
Create the group first in Settings / Addons with Add Group, then add at least one item to the group with Add Addon. The guest booking widget uses the group name, group description, item names, item descriptions, item prices, and item images from the add-on settings.
Check the group rules before attaching it:
- The group should be active, not archived.
- The group should contain active add-on items.
- Required groups should have at least one active item, otherwise guests cannot satisfy the required selection.
- The limit type should match the way the team fulfills the offer: Per party, Per cover, or Fixed.
Attach groups to an experience
- Open Settings / Experiences.
- Create a new experience or edit the existing experience.
- Select the Basics tab.
- Find Available Addon Groups.
- Select each active group guests should see for this experience.
- Leave unrelated groups unchecked.
- Select Save Changes.
- Test the public booking flow for the experience.
Leave all groups unselected when the experience should not show add-ons.
Archived groups can appear in the list as (Archived) and disabled. They cannot be newly attached while archived. If an archived group is still checked from older data, clear it or restore the group before relying on that experience in public booking.
What guests see
When a guest selects an experience with attached active groups, the booking widget includes an add-on step titled Select Add-ons in wizard mode and shows the Add-ons section. If the selected experience has no attached active groups, the booking flow skips add-on selection.
Attach only add-ons that fit the experience. Wine pairings may belong on a tasting menu but not on a quick lunch. Celebration extras may belong on dinner and private events but not on every reservation.
Each attached group appears with its guest-facing name and description. The widget marks the group as Required or Optional, shows the limit, and tracks how many items have been selected. For Per party groups, guests select one item for the reservation. For Per cover groups, the limit follows the party size. For Fixed groups, guests can select up to the fixed limit or unlimited quantities if the group is set to unlimited.
Selected add-ons are submitted with the reservation and included in payment or gift-card quote calculations when that booking path uses online payment. Changing the selected experience clears any add-ons previously selected for another experience.
Edge cases
Creating an add-on group does not show it everywhere. A group appears only when it is active and attached to the selected experience.
Archiving a group removes it from linked experiences and hides it from public booking. Archiving an individual add-on item hides that item from public booking but leaves the parent group active. Review the experience after archiving so guests do not land on an empty or irrelevant add-on step.
An attached group with no active items can still create a poor booking path. If the group is optional, guests may see a group with nothing useful to choose. If the group is required, guests can be blocked because there is no active option to select.
Existing reservations are not rewritten when you change the groups on an experience. The change affects new guest booking sessions for that experience.
Verify the setup
After saving the experience:
- Open the public booking page.
- Choose the same experience you edited.
- Select a valid date, time, and party size.
- Confirm that the add-on step appears only for experiences with attached active groups.
- Confirm each group shows the expected name, description, required or optional state, and limit.
- Try continuing without a selection for any required group and confirm the widget asks for at least one option.
- Select add-ons, continue to guest details, and confirm the summary or payment step reflects the selected items.
- Repeat with an experience that should not show add-ons and confirm the flow skips add-on selection.
Troubleshooting
If guests do not see the expected add-ons:
- Confirm the add-on group exists and is not archived.
- Confirm the group has at least one active add-on item.
- Confirm the group is selected in the experience.
- Confirm the guest selected that exact experience on the booking page.
- Confirm the item itself is not archived.
- Confirm the public booking page was refreshed after saving the experience.