Payments & Revenue Protection
Create a prepaid experience
Require full upfront payment for an experience, including provider readiness, price, service fee, add-ons, and cancellation outcomes.
When to use Prepay
Use Prepay when every booking for an experience should be paid in full before the reservation is confirmed. This is common for tasting menus, ticketed dinners, workshops, holiday menus, or any experience where the booking itself is the sale.
Prepay is configured per experience in Settings / Experiences, on the Payment tab. It is different from Optional Prepay: Optional Prepay lets the guest choose pay now or pay at the venue, while Prepay always routes the guest to online payment when the policy applies.
Check prerequisites
Before publishing a prepaid experience:
- Confirm the restaurant has a connected, ready payment provider. If the payment integration is missing or not ready, Reslify cannot create the guest checkout session.
- Decide which selected add-ons should be paid online with the experience. Add-ons linked to the experience are included in checkout when the guest selects them.
- Make sure the payment price is the amount the guest should be charged. The experience display price is separate from the Price per person field used for checkout.
- Review the generated cancellation terms before launch. Guests accept these terms during booking, and Reslify stores the accepted version with the reservation.
Configure full payment
- Open Settings / Experiences.
- Create or edit the experience.
- Go to the Payment tab.
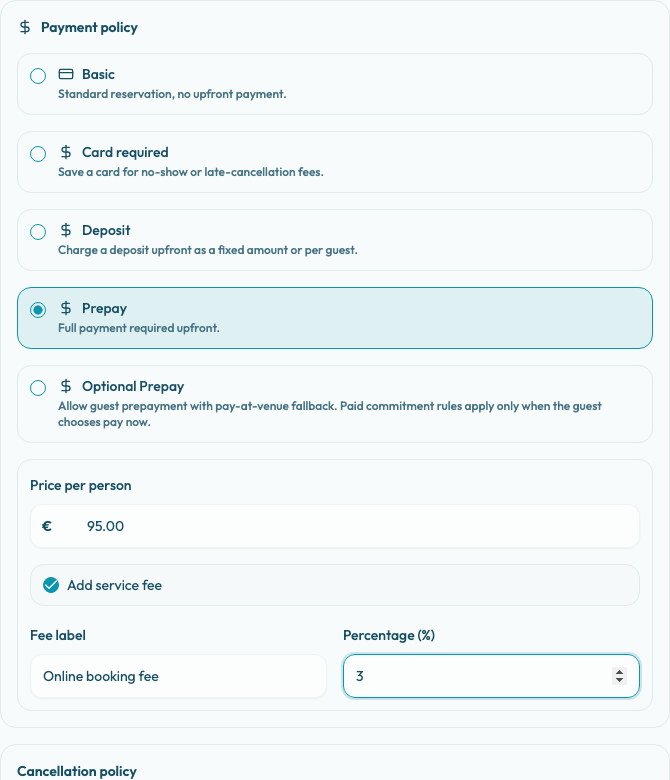
- Select Prepay.
- Enter Price per person. This amount must be greater than zero and is multiplied by the guest count.
- Turn on Add service fee only when the restaurant should add a checkout fee.
- Enter the Fee label and Percentage (%). The percentage is added as one checkout line item after the experience and selected add-ons.
- Review the Paid commitment rules under Cancellation policy.
- Save the experience.
The price should match what the guest is buying. If taxes, beverages, supplements, or service are handled separately, explain that clearly in the experience description or guest policy.
Configure cancellation outcomes
Prepay requires Paid commitment rules. These rules decide what happens to the paid amount after guest cancellation, team cancellation, or no-show.
Use When the guest cancels to build a complete timeline from booking time until reservation start. Each window can return a Cash refund, issue Venue credit, or give No refund. The timeline must cover the full period without overlaps or gaps before the experience can be saved.
Use When your team cancels to choose the outcome when staff cancel the reservation. This outcome is applied automatically when the team cancels.
Use When the guest does not show to choose the no-show outcome. This outcome is configured here, but staff apply it manually in Operations after marking the reservation as no-show.
The default paid commitment setup starts with a 100% cash refund until 24 hours before the reservation, no refund inside the last 24 hours, 100% cash refund when the team cancels, and no refund for no-show. Adjust those defaults to match the restaurant's actual policy.
What happens during booking
When a guest books a prepaid experience:
- The guest chooses date, time, party size, and experience.
- The guest selects any available add-ons.
- The guest enters contact details and accepts required guest and cancellation terms.
- Reslify creates a pending payment reservation and sends the guest to the payment page.
- The payment page shows Full prepayment, Due now, and the total due.
- The total includes the experience price multiplied by guest count, selected add-ons, and the configured service fee when enabled.
- The reservation is confirmed only after the configured payment provider confirms the payment.
If payment fails, the checkout session cannot be created, or the guest abandons payment, the reservation should not be treated as confirmed.